Description
When designing a Revit Add-In for Revit you need to be aware of the ways you got at hand to access the Revit model. Reading data from Revit is easily done, your add-in will have to be started from an IExternalCommand interface, and by doing so the framework will give you the ExternalCommandData from which you can extact the UIApplication.

If you want to make changes to the Revit model then you need to be aware of several concepts. Your add-in will work on a different environment therefore in a different context, therefore :
- you need to create an external event that will be called from the Framework and that ensures that the right context is set.
- you need to use a transaction to commit changes in the Revit model.
Similar to the .NET transaction classes a transaction is a single unit of work that ensures data integrity and consistency. It follows ACID principle which means either ALL or NONE. A transaction is successful if all operations are committed, if any operation must be canceled or rolled back, then all of the data operations need to be removed.
ACID
In computer science, ACID (Atomicity, Consistency, Isolation, Durability) is a set of concepts that ensures operating with the database in a secure manner. This means that the transactions are intended to guarantee validity even in the event of errors, power failures, etc. In the context of databases, a sequence of database operations that satisfies the ACID properties, and thus can be perceived as a single logical operation on the data, is called a transaction.
Implementing
There are many examples of implementing an external event on the web, however I will present you my customized version of handling this.
In many cases when creating your own framework or add-in you may want to make use of other frameworks but sometimes it’s a good practice to wrap them using a custom class. This is important because by doing this you decouple the rest of the application from the use of that particular function, and because you can customize it to work easier for you
Here is the example I used to when I first encountered this concept : ExternalEvents
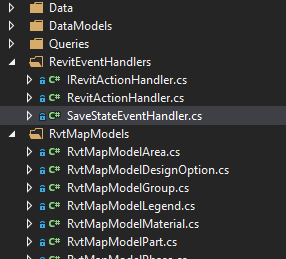
In the to the right I have 2 classes defined where I wrap the linking to Revit context (ExternalEvent) in a custom class, and then I use that link in a different handler.
SaveStateEventHandler – This class implements the IExternalEventHandler. It’s important to notice that this is the only link between the add-in action and Revit context. This class stores the function to be executed and it creates the transaction encapsulated in a try…catch block
RevitActionHandler – This class implements IRevitActionHandler. This interface doesn’t care of the context (Revit or not), it only mandates that there is an Action and a RaiseEvent function, which depending on the context may change a model in Revit context or not.

Advantages
By using 2 classes now I decoupled the external event functionality from the addin. I found it a good practice because now i was able to create 2 projects:
- One project runs in Revit context as an add-in and when RevitActionHandler.RaiseEvent is called, this call forwards to SaveStateEventHandler which makes changes in Revit.
- The other project is a TestProject, it runs in a simple WPF application. It does not have a Revit context therefore when RevitActionHandler.RaiseEvent is called the action is just executed.
The interface
    // Handles operations linking the addin and Revit Context
    public interface IRevitActionHandler
    {
        // Action called when transaction finished
        event Action OnExecuted;

        // Evaluates the action in the revit context
        void RaiseEvent(string transactionName, Action actionInRvtContext);
    }
This interface is the contract used by both projects (test project and Revit addin project) to manage changing context (saving objects in my case)
Test Project - implementing IRevitActionHandler
In my test project the IRevitActionHandler does not need the Revit context, there for I just execute the action.
  public class MokRevitActionHandler : IRevitActionHandler
    {
        public event Action OnExecuted;

        public void RaiseEvent(string transactionName, Action actionInRvtContext)
        {
            actionInRvtContext();
            OnExecuted?.Invoke();
        }
    }
Add-in Project - implementing IRevitActionHandler
using Autodesk.Revit.UI;
using System;
using System.Collections.Generic;
using System.Linq;
using System.Text;
using System.Threading.Tasks;

namespace RHAPP_RevitInteract.RevitEventHandlers
{
    // Handles operations linking the addin and Revit Context
    public class RevitActionHandler : IRevitActionHandler
    {

        // Handler managing this app action
        private SaveStateEventHandler SaveStateEventHandler { get; set; }

        // Revit event handling - see SaveStateEventHandler
        private ExternalEvent RevitExternalEvent { get; set; }

        // Action called when transaction finished
        public event Action OnExecuted
        {
            add
            {
                if (this.SaveStateEventHandler != null)
                {
                    this.SaveStateEventHandler.OnExecuted += value;
                }
            }
            remove
            {
                if (this.SaveStateEventHandler != null)
                {
                    this.SaveStateEventHandler.OnExecuted -= value;
                }
            }
        }

        // Creates a new instance of RevitActionHandler. Ensures execution of action in Revit context
        public RevitActionHandler(Autodesk.Revit.DB.Document document)
        {
            this.SaveStateEventHandler = new SaveStateEventHandler(document);
            this.RevitExternalEvent = ExternalEvent.Create(this.SaveStateEventHandler);
        }

        // Evaluates the action in the revit context
        public void RaiseEvent(string transactionName, Action action)
        {
            this.SaveStateEventHandler.TransactAction = action;
            this.SaveStateEventHandler.TransactionName = transactionName;
            RevitExternalEvent.Raise();
            //WHEN ABOVE IS RAISE - REVIT CALLES THE EXECUTE() METHOD IN SaveStateEventHandler
        }
    }
}
using Autodesk.Revit.DB;
using Autodesk.Revit.UI;
using System;
using System.Collections.Generic;
using System.Linq;
using System.Text;
using System.Threading.Tasks;
using System.Windows;

namespace RHAPP_RevitInteract.RevitEventHandlers
{
    public class SaveStateEventHandler : IExternalEventHandler
    {
        // Action that is executed in RevitContext
        public Action TransactAction;

        // Name of the new Transaction
        public string TransactionName { get; set; }

        // Event called after transaction has finished
        public event Action OnExecuted;

        // An object that represents an open Autodesk Revit project.
        public Autodesk.Revit.DB.Document Document { get; set; }

        // Flag showing if document is opened or not
        private bool DocumentIsOpen { get; set; }

        public SaveStateEventHandler(Document document)
        {
            this.Document = document;
            this.DocumentIsOpen = true;
            this.Document.DocumentClosing += Document_DocumentClosing;
        }

        private void Document_DocumentClosing(object sender, Autodesk.Revit.DB.Events.DocumentClosingEventArgs e)
        {
            this.DocumentIsOpen = false;
        }
        // Methods to invoked to execute in Revit Context
        public void Execute(UIApplication app)
        {
            if (this.DocumentIsOpen && this.TransactAction != null)
            {
                try
                {
                    using (Transaction transaction = new Transaction(RHAPP_OnStart.DBDocument, this.TransactionName))
                    {

                        transaction.Start();
                        //the action is provided by RevitActionHandler
                        this.TransactAction?.Invoke();
                        transaction.Commit();
                        //event triggered after transaction has commited
                        this.OnExecuted?.Invoke();
                    }
                }
                catch(Exception ex)
                {
                    MessageBox.Show(ex.Message);
                }
            }
        }

        public string GetName()
        {
            //CHange name
            return "RHAPPSAVEEVTHND";
        }
    }
}
Usage
   RevitActionHandler handler = new RevitActionHandler(DBDocument);

   RevitActionHandler.RaiseEvent("TransactionName", () =>
            {
                //your statements here will be called in a transaction
            });


